
Configuration Guide
Instructions for configuring SLIP components in the SharePoint farm and on the Client Automation Servers
Document History
Date | Description |
March 14, 2011 | Started document. Created section on Task List Solution. |
June 29, 2011 | Updating SLIP Task List solution features section. |
July 1, 2011 | Started SLIP SharePoint Connector features section. |
November 14, 2011 | Expanded on schema map example. |
August 1, 2012 | Added new functions for schema. |
September 10, 2012 | Added Parse function for schema. |
April 15, 2013 | Added detailed information on all schema functions. |
Introduction
This document aims to guide your through the common configuration points while establishing a SLIP infrastructure and converting and publishing content to a standard SharePoint 2010 web application.
SLIP components are mainly targeted at SharePoint but, depending on requirements, you may have use for the non-SharePoint components as well for specific conversion tasks. This document describes the configuration process required to setup SLIP:td in a SharePoint farm.
High-level SLIP:td solution and features overview
The table shows all the SLIP:td SharePoint solutions and features and the different scope levels they are installed and activated on
Solution / Feature | Site | Site collection | Web application | Farm |
SLIP Task List.wsp | | | | |
| SLIP Task List Infrastructure | | 
| | |
| SLIP Transaction Manage | | | 
| |
| SLIP Clean Up Agent | | | 
| |
SLIP SharePoint Connector.wsp | | | | |
| SLIP SharePoint Connector Web Application Configuration (Hidden) | | | 
| |
| SLIP SharePoint Connector | 
| | | |
| SLIP Create Tasks | | 
| | |
| SLIP Redeployment | | 
| | |
SLIP SharePoint Publishing Foundation.wsp | | | | |
| SLIP SharePoint Foundation | | 
| | |
| SLIP SharePoint Publishing | | 
| | |
| SLIP SharePoint Page Deployer | | 
| | |
SLIP HTML Converter Pack.wsp | | | | |
| SLIP HTML Converter | | 
| | |
| SLIP SharePoint HTML Converter | | 
| | |
SLIP OOX Converter Pack.wsp | | | | |
| SLIP OOX Converter Pack | | 
| | |
SLIP PDF Converter Pack.wsp | | | | |
| SLIP PDF Converter Pack | | 
| | |
SLIP WAS Converter Pack.wsp | | | | |
| SLIP WAS Converter Pack | | 
| | |
SLIP SharePoint Client Automation Services.wsp | | | | |
| SLIP CAS Converter Pack | | 
| | |
SLIP Search.wsp | | | | |
| SLIP Search Infrastructure | | | | 
|
Prerequisites
To get the most out of this document you should have a working SharePoint 2010 publishing web site up and running with all therequired SLIP:td solutions installed. If you plan to convert and publish other formats than Microsoft Word you should also have a working SLIP Client Automation Server (SLIP CAS) running in your environment.
Refer to the SLIP:td Installation Guide for how to install the SLIP SharePoint solutions and a SLIP CAS.
SLIP Task List Solution
This solution is the foundation for the SLIP:td infrastructure and is required to be implementation in your SharePoint infrastructure. The SLIP Task List solution contains two web application features and a single site collection feature.
The following sections describe each of the features and their configuration options.
SLIP Task List Infrastructure
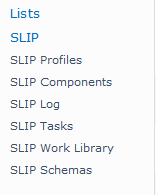
The SLIP Task List Infrastructure site collection feature must be activated on minimum one site collection and will automatically create the following base SLIP lists.
•SLIP Profiles – list of profiles defining the conversion and deployment rules to be assigned to a task
•SLIP Components – list of all available SLIP components organized by type
•SLIP Log – list containing all the logging information and errors reported by the SLIP components
•SLIP Tasks – the queue of tasks processed according to matching profiles
•SLIP Work Library – special document library that acts as a temporary internal storage
•SLIP Schemas – items containing the rules for mapping column values to be assigned to a profile
Typically the feature is activated in the root site collection of the web application but it’s very flexible and can be running in its own web application or site collection depending on customer requirements.
For the use in this document and to walk-through the configuration steps we’ll active the SLIP Task List infrastructure feature on the root site collection by clicking Site Settings, Site Collection Features and the Activate button next to the SLIP Task List Infrastructure feature.
After a few seconds the feature is activated:

And all the SLIP lists described above should now be available in the left side navigation:
Your SLIP Task List is now created but it can’t do anything on its own so for anything interesting to happen we need to activate some more features.
SLIP Transaction Manager
Processing of SLIP tasks can be enabled and disabled by activating or deactivating the transaction manager web application feature within the Central Administration. The SLIP Transaction Manager is a SharePoint timer job based solution which monitors all SLIP Task Lists and applies the profiles to pending SLIP tasks and initiates the conversion and deployment process.
Even though the SLIP Transaction Manager works at web application level, it is possible to enable or disable processing of an individual task lists. This can be done from the task list itself with the toggle button Task Processing. For backwards compatibility with SharePoint 2007 the same option is available by clicking Site Settings, Site Collection Administration and finally SLIP task processing settings.
SLIP Clean Up Agent
To keep all the SLIP Task List up to date and clean out all completed or obsolete tasks the SLIP Clean Up Agent can be activated on web application level within the Central Administration. After enabling the web application feature on your web application(s) it’s now possible to specify the default clean up settings for all SLIP Task Lists created on the selected web application following the below steps.
1. Select your Web Application and click the SLIP Clean Up Agent button as illustrated below: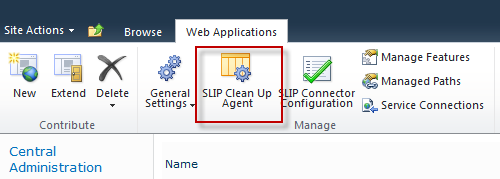
2. Enter the preferred clean up settings for the web application and click Apply -> OK
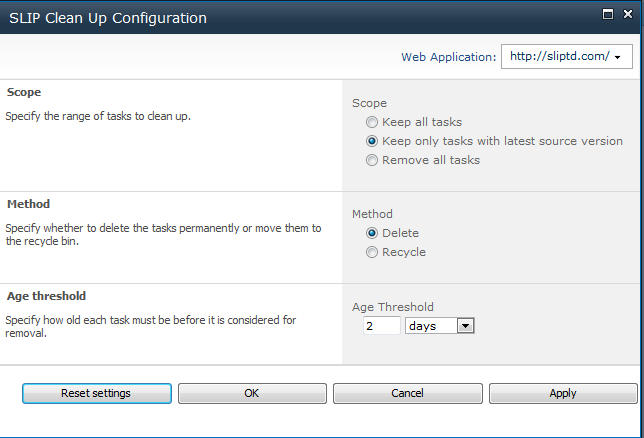
The settings specified on web application level are default clean up settings for all SLIP Task Lists created within the selected web application. Individual settings can be specified per Task List simply by clicking Site Settings, Site Collection Administration and finally SLIP Clean Up Agent configuration and enter your configuration settings followed by Apply > OK to save the settings.
After activating all the features found in the SLIP Task List infrastructure you’re ready to connect your document libraries to the SLIP Task List and process some documents.
SLIP SharePoint Connector Solution
The main purpose of this solution is to SLIP enable your SharePoint based document management system by delivering a simple interface to connect standard SharePoint document libraries and lists to any SLIP Task Lists available within the SharePoint farm.
The SharePoint Connector listens for events in your SharePoint libraries and lists and creates tasks for appropriate events.
The SLIP SharePoint Connector solution is not required to be installed and configured since creation of SLIP Tasks can be accomplished directly from custom work flows and/or code using the supplied SLIP Connector interface, which is not currently covered in this document.
The SLIP Task List solution contains 4 features. One feature has web application scope, two have site collection scope and one has site scope.
Scope | Site | Site Collection | Web Application |
SLIP SharePoint Connector Web Application Configuration (Hidden) | | | 
|
SLIP SharePoint Connector | 
| | |
SLIP Create Tasks | | 
| |
SLIP Redeployment | | 
| |
The following sections describe each of the features and their configuration options.
SLIP SharePoint Connector Web Application Configuration
The SLIP SharePoint Connector Web Application Configuration is a hidden web application scoped feature activated by default. The feature installs the SLIP SharePoint Connector Configuration pages and ribbon action menu buttons used to specify target task list settings. The different configuration points are covered in the next section.
SLIP SharePoint Connector
Besides configuration of list and library synchronization the SharePoint Connector enables you to configure which task list should receive the generated tasks, i.e. the target task list. The synchronization control is available only at site level through Site Settings, Site Administration and finally SLIP SharePoint Connector. The target task list can be configured for all farm levels from site to farm level. To configure the target task list for site or site collection level use the configuration page under Site Administration.
To configure the default target task list for web application or farm level go to Central Administration, Application Management, Manage web applications. Then click SLIP Connector Configuration to edit the target task list settings.
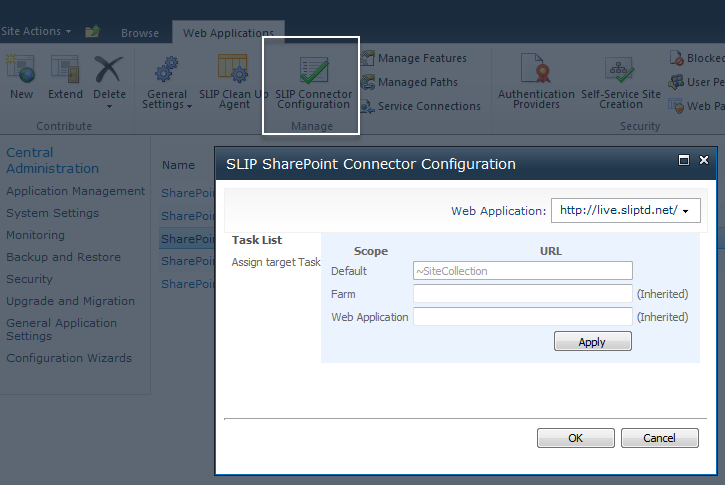
By Default the connector will target a task list at the site collection from which the list or library item event originates (defined by ~SiteCollection).
The Farm input box allows you to specify a fully qualified URL e.g. http://administration.sliptd.com:8001 to the site collection hosting a SLIP Task List. The Farm setting will be used as the default configuration setting for all web applications created within the farm.
The Web Application setting can again be a fully qualified URL e.g. http://administration.sliptd.com:8001 or a relative path like / which will send all tasks to the SLIP Task list created in the root of the web application. This is a common configuration for customer using many site collections and wants to use a central Task List within the same web application.
For a basic setup use or create a simple document library within the same site collection where your task list exists. In our sample solution described in this document we use a single site collection with multiple sites. A site
Then enable the SLIP SharePoint Connector feature within that site and open the configuration page at Site Settings, Site Administration and finally SLIP SharePoint Connector.
In the Synchronization Events column click Enable next to the source list or document library to enable synchronization event handlers. Now, depending on the versioning settings for the library, a SLIP task will be created in the task list each time a document is checked in/out, edited, uploaded or deleted.
If you have configured the SLIP Profile you should be able to view the published result in a few seconds. Go to the task list to monitor progress.
Please note that if you use the SLIP Document Converter or use the SLIP Task List Interface programmatically you do not need to enable synchronization.
See SLIP:td Getting Started Guide for further details on getting started with the SLIP SharePoint Connector Solution.
In the following the sections you’ll learn how to activate the SLIP SharePoint Connector and configure it to automatically synchronize all documents in a standard SharePoint Library with the SLIP Task List.
Follow the procedure below to activate the SLIP SharePoint Connector feature on your document site(s)
1. Open the SharePoint site hosting the source documents/libraries
2. Click Site Actions > Site Settings
3. Click Manage site features in the Site Actions section
4. Activate the SLIP SharePoint Connector site feature

5. Click Site Settings in the bread crumbs and locate the new SLIP SharePoint Connector link found in the Site Administration section
SLIP SharePoint Connector Configuration
Follow the procedures below to configure the SLIP SharePoint Connector to automatically synchronize documents with your SLIP Task List for transformation and deployment to your web site.
NOTE: If you use the SLIP Document Converter or use the SLIP Task List Interface programmatically you do not need to enable synchronization.
1. Open the SharePoint site hosting the source documents/libraries
2. Click Site Actions > Site Settings
3. Click the new SLIP SharePoint Connector link found in the Site Administration section
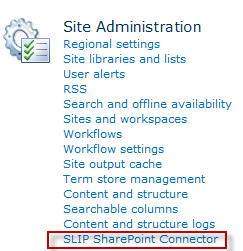
4. On the SLIP SharePoint Connector Configuration page all Document Libraries available on the current site are listed in an alphabetical order.
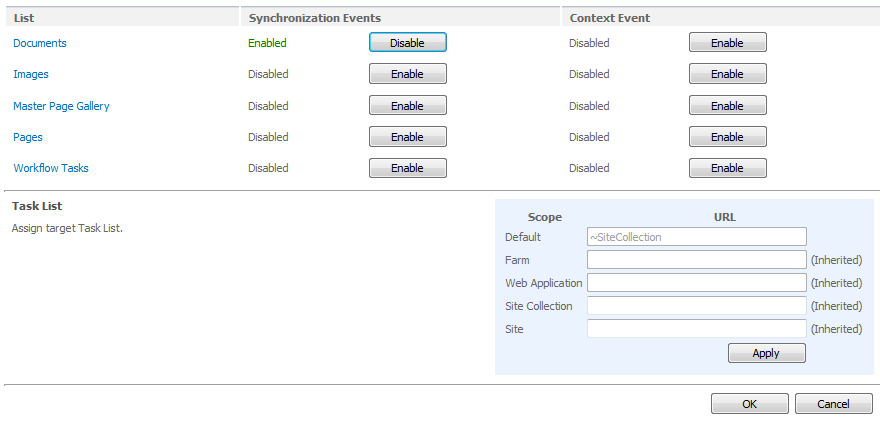
5. Click the Enable button next to your document library either under the Synchronization Events (will automatically create tasks in the Task List).
NOTE: The Context Event requires special action buttons implemented into your Document Library context menu or workflow.
6. In the Task List section below you can leave the inherited settings defined on web application level earlier in this document or specify individual site setting if you need to connect documents to a special Task List.
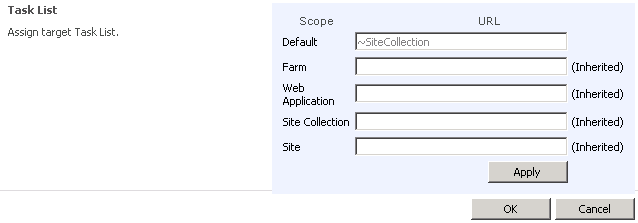
7. Click OK to finish the SLIP SharePoint Configuration
8. Try to upload and check in a Microsoft Word 2010 (.DOCX) source document as a major version into your document library and verify a task is created in the SLIP Task list

9. Refresh the Task List and the status will soon change the Complete.
Configuration of SLIP:td
After you have successfully connected your document library to a task list and seen a task gets processed the SLIP:td foundation is in place but we’re not ready yet!
Open the SLIP Log list and you’ll notice that even the Deployment completed the “The profile 'Default' does not have any process defined. No preparation, conversion or deployment entries are defined.”

In the next steps we’ll apply a conversion and deployment process matching our business requirements for automating the content flow between authors and consumers.
Useful SLIP Task List Actions Buttons
Working within the SLIP Task List as an administrator or while configuring SLIP a set of useful actions buttons are available and worth knowing.
When a SLIP Task is selected within the SLIP Task List the below buttons are selectable inthe Documents Ribbon tool bar

The same options are available from the item action menu
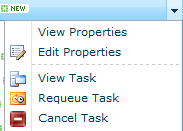
View/Edit Properties
Standard SharePoint Properties actions which are often used to view or change Properties of a SLIP Task.
View Task action button
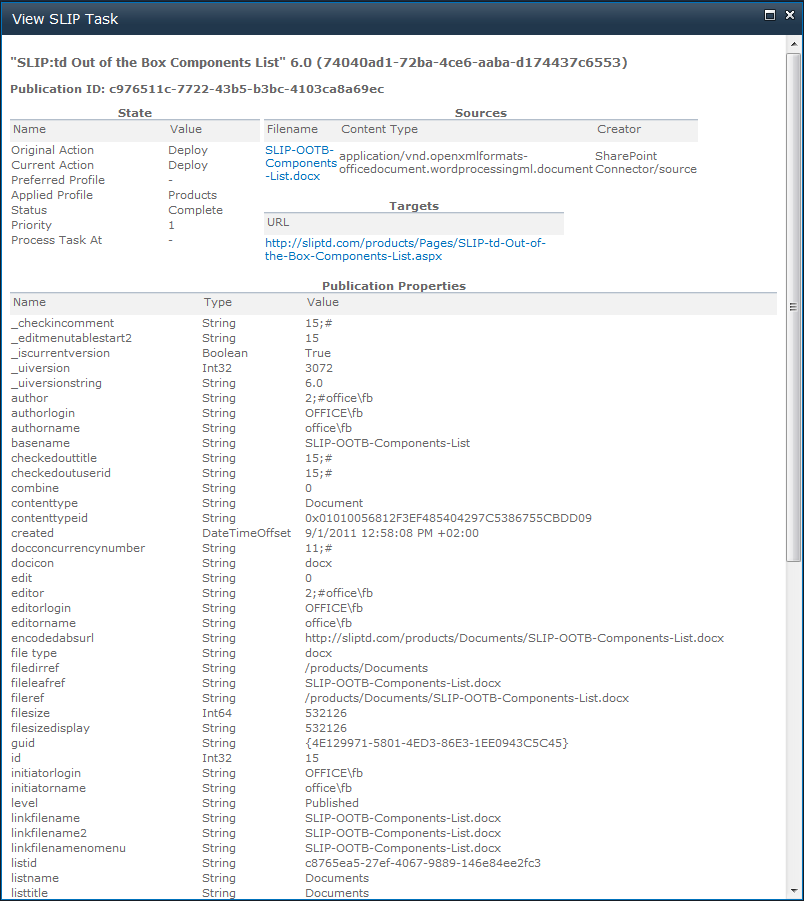
Each SLIP task contains the source file and a set of metadata properties including information about where the document is stored. The view task action is useful when configuring SLIP:td or need to get a pointer to the location of the source document or the output deployed by SLIP:td.
Figur 1 Example of a Viewed Task
Requeue Tasks
Use this action to change the change the Task status from Failed or Completed to Pending to start the convertion process again.
Cancel Pending Tasks
Use this action to cancel one or more Pending tasks
SLIP Profile
Open the SLIP Profiles list http://sitename/Lists/SlipProfileList/AllItems.aspx and locate the existing entry named Default.
Figur 2 Illustration of the Default SLIP Profile matching all incoming tasks
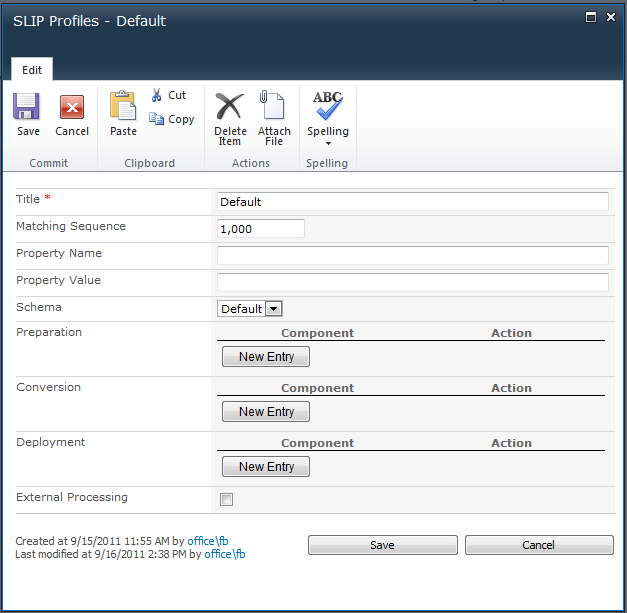
SLIP Profiles are automatically assigned to Pending tasks by the SLIP Transaction Manager timer job based on the sequence and matching rule specified on the Profile(s). A SLIP Profile is basically a rule set for what to do with a task in other words how to convert the incoming document and where to deploy the output to.
The best way to learn how a SLIP Profile works and can be configured to meet our business requirements are learning by examples. In the following sections we’ll built a Profile named Products which will match incoming tasks from a specific folder within a standard SharePoint document library.
Step by step we’ll add SLIP components to the profile and enable html and pdf publishing to an internet/intranet facing SharePoint Publishing site.
Let’s get started and create our own Products Profile used in all samples in the rest of this guide.
Clone a Profile
Within the SLIP Profiles list it’s possible to make a copy of an existing Profile which makes it very easy to reuse exiting Profile settings and simply amend the changes to meet the new business requirements. In our sample we’ll clone the default profile and make a new Products profile.
1. Open the SLIP Profiles list
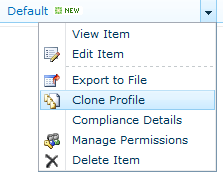
2. Select the Default profile from the action menu and click Clone Profile.
3. Edit the newly cloned Profile and change the title to Products and the Matching sequence to 50
4. Save the profile
5. Open the SLIP Task list and Edit Properties on the existing Completed task
6. Change Status to Pending and Applied Profile to (None)
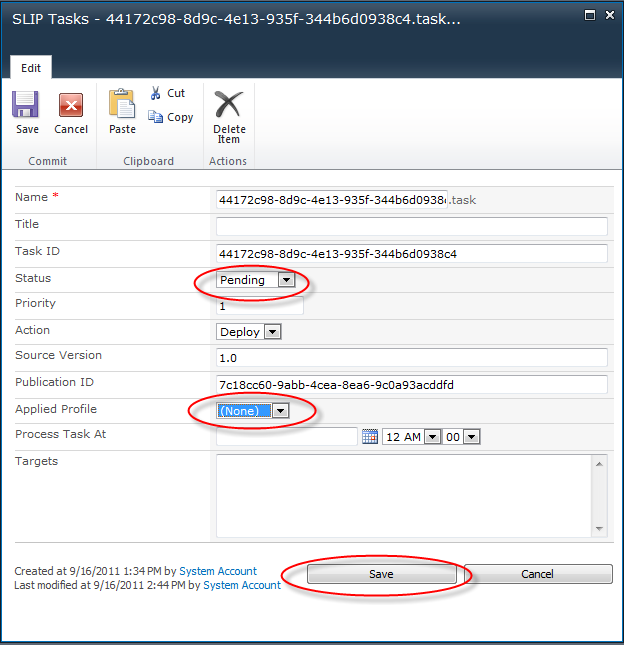
7. Save the task
8. Refresh the Task List and the new Products profile is now applied to the task due to the lower Matching sequence number.

Property matching and sequence
The underlying SLIP Transaction Manager attempts to match each profile sequentially based on the Matching sequence number amended to each profile (lowest number first).
To match anything before the Default profile shipped with the Standard SLIP:td solution a profile with a lower matching sequence number must be created. If you like to match specific tasks and apply a different conversion and/or deployment profile it’s possible to do so using property name and value matching.
In the sample below the Matching Sequence is set to 50 and will only match tasks with an exact SharePoint sitetitle property value of “Products”. The property value can be a simple string or as illustrated below a regular expression.

Edit the Products profile and apply the above Property name “sitetitle” and Property value “^Products$” and save the profile again.
Schema
The schema enables mapping of metadata properties to publishing fields. There are a number of mapping functions available that allow you to adjust the published values significantly. The following is a sample schema that includes examples of all available functions. Below that you’ll find technical descriptions of each one.
<Map xmlns:xs="http://www.w3.org/2001/XMLSchema" xmlns:xsi="http://www.w3.org/2001/XMLSchema-instance">
<Mapping TargetName="SlipVersion">
<Property>_uiversionstring</Property>
</Mapping>
<Mapping TargetName="Modified">
<Property>Modified</Property>
</Mapping>
<Mapping TargetName="Created">
<Property>Created</Property>
</Mapping>
<Mapping TargetName="Author">
<Property>Author</Property>
</Mapping>
<Mapping TargetName="Editor">
<Property>Editor</Property>
</Mapping>
<Mapping TargetName="Comments">
<Property>Comments</Property>
</Mapping>
<Mapping TargetName="TaxKeyword">
<Property>taxkeyword</Property>
</Mapping>
<Mapping TargetName="TaxOrganization">
<Property>taxorganization</Property>
</Mapping>
<Mapping TargetName="Departments">
<Regex Expression="^(?:\d+;#)?(.*)$" Replacement="$1">
<Property>departments</Property>
</Regex>
</Mapping>
<Mapping TargetName="Extension">
<Regex Expression="(\.[^.]+)$">
<Property>filename</Property>
</Regex>
</Mapping>
<Mapping TargetName="Category">
<Value xsi:type="xs:string">Main</Value>
</Mapping>
<Mapping TargetName="Expires">
<Value xsi:type="xs:dateTime">2018-03-15T10:00:00+01:00</Value>
</Mapping>
<Mapping TargetName="ModifiedFormatted">
<Format Pattern="m" Culture="en-US">
<Property>Modified</Property>
</Format>
</Mapping>
<Mapping TargetName="SlipDmsDocumentUrl">
<Concat Prefix="" Separator="" Postfix="">
<Property>SiteUrl</Property>
<Property>SiteRelativeDisplayFormUrl</Property>
<Value xsi:type="xs:string">?ID=</Value>
<Property>Id</Property>
</Concat>
</Mapping>
<Mapping TargetName="DeployerContentType">
<Conditional>
<Equals>
<Operand>
<Property>doctype</Property>
</Operand>
<Operand>
<Value xsi:type="xs:string">IMAP Document</Value>
</Operand>
</Equals>
<Result>
<Value xsi:type="xs:string">0x010100527d73a3b86d4d6dafa6128f6177dd75</Value>
</Result>
</Conditional>
</Mapping>
<MappingTargetName="DocumentStartDate">
<Parse Pattern="dd-MM-yyyy" xsi:type="xs:dateTime" Culture="">
<Property>DocValidFromText</Property>
</Parse>
</Mapping>
<MappingTargetName="WordCategory">
<Slice Take="1" Skip="0">
<RegexExpression="^\s*(\d+)\s*\.\s*(.*?)\s*$" Replacement="$2">
<Property>Category</Property>
<Property>ITCategory</Property>
<Property>HRCategory</Property>
<Property>OBFCategory</Property>
</Regex>
<Valuexsi:type="xs:string">Office Procedures</Value>
</Slice>
</Mapping>
<Mapping TargetName="TargetPath">
<Concat Prefix="/" Separator="/" Postfix="/">
<Transliterate>
<Regex Expression="\W+" Replacement="-">
<Regex Split="\s*:\s*">
<Property>Structure</Property>
</Regex>
</Regex>
</Transliterate>
</Concat>
</Mapping>
</Map>
•Property names are not case-sensitive.
•The Format, Regex, Parse, Concat, Operand, Parse, Slice and Result functions allows functions as nested input values.
•For the Regex function, the Replacement attribute is optional and the result will be the matched value if that attribute is not present.
•For the Parse function, the Pattern and Culture attributes are optional. If the xsi:type attribute is not specified or supported, the output type defaults to string. The Pattern and Culture do not apply to all output types.
•If no format or parse culture is specified, the invariant culture is used.
•The Culture reference may be either a decimal LCID or a Culture Name from the table at National Language Support (NLS) API Reference.
The following table provides links to detailed information on the format syntax that can be used for the various property types.


Mapping
Usage: <Mapping TargetName="FieldName">…</Mapping>
The Mapping element points to a publishing field that should receive the values enclosed in the element.
Elements:
Attributes:
Property
Usage: <Property>Task property name</Property>
The Property element selects the values of a task property. The contents of the element specifies the name of the task property. Please note that a task property may contain more than one value.
Elements:
The Property element does not contain child elements.
Attributes:
The Property element does not contain attributes.
Regex
Usage:
<Regex Expression="\d+">…</Regex>
<Regex Expression="(\d+;#)?(.*)" Replacement="$2">…</Regex>
<Regex Expression="(\d+;#)?(.*)">
<Replacement>…</Replacement>
</Regex>
<Regex Split="\s*:\s*">…</Regex>
The Regex element executes a regular expression over each input value. If you specify the Replacement attribute, the result is the replaced value. If you omit the Replacement attribute, the result is the matched value. If you specify the Split attribute, the result is a set of substrings. The Expression and Split attributes are mutually exclusive and you cannot used the Replacement attribute or the Replacement element along with the Split attribute either. Please note that each input value results in an output value for non-split operations. Any input values that are not of type string are converted to their string representation using the invariant culture.
Elements:
•Property
•Regex
•Value
•Format
•Concat
•Conditional
•Parse
•Slice
•Replacement
Attributes:
•Expression – this required attribute defines the regular expression pattern.
•Replacement – this optional attribute defines the replacement pattern.
•Split – this optional attribute defines the split pattern.
Now
Usage: <Now Zone="PT2H" />
The Now element evaluates to the current date and time. You may specify a specific time zone or use the default local time zone.
Elements:
The Now element does not contain child elements.
Attributes:
Please note that if you only require a date value, you can use the Format function to output the required bits.
Value
Usage: <Value xsi:type="…">…</Value>
The Value element contains a static value that accepts a type designation like string or date.
Elements:
The Valueelement does not contain child elements.
Attributes:
The following types have meaning for the SLIP schema. The system will read any other value as a simple string.
Format
Usage: <Format Pattern="m" Culture="da-DK">…</Format>
The Format element converts a typed value into a string representation.
Elements:
•Property
•Regex
•Value
•Format
•Concat
•Conditional
•Parse
•Slice
Attributes:
Concat
Usage: <Concat Prefix="…" Separator="…" Postfix="…">…</Concat>
The Concat element glues several values together as one using optional prefix, postfix and separator values.
Elements:
•Property
•Regex
•Value
•Format
•Concat
•Conditional
•Parse
•Slice
Attributes:
•Prefix – this optional attribute specifies the beginning of the resulting string.
•Separator – this optional attribute defines the separator value.
•Postfix – this optional attribute specified the ending of the resulting string.
Transliterate
Usage:
<Transliterate>
…
</Transliterate>
The Transliterate element maps any non-ascii character to one or more roughly equivalent ascii characters.
Elements:
•Property
•Regex
•Value
•Format
•Concat
•Conditional
•Parse
•Slice
This function has no attributes.
Conditional, Equals, NotEquals, Contains, Operand, Result
Usage:
<Conditional>
<Test>
<Operand>…</Operand>
<Operand>…</Operand>
</Test>
<Result>
…
</Result>
</Conditional>
The Conditinal element yields its result only if the test operation evaluates to true.
Elements:
•Equals – this test operation is true when the values in the first operand are the same as the values in the second operand and they have the same order.
•NotEquals – this test operation is true when the values in the first operand are different from the values in the second operand or they have a different order.
•Contains – this test operation is true when all the values in the second operand are also present in the first operand. The order is irrelevant.
•Result – when the conditional test operation is true, this is the result.
Parse
Usage: <Parse Pattern="…" Culture="…" xsi:type="…">…</Parse>
The Parse element glues several values together as one using optional prefix, postfix and separator values.
Elements:
•Property
•Regex
•Value
•Format
•Concat
•Conditional
•Parse
•Slice
Attributes:
•Culture – this optional attribute may be either a decimal LCID or a Culture Name from the table at National Language Support (NLS) API Reference. If this attribute is missing, the invariant culture is used.
•xsi:type – this optional attribute specified the output type for the parse operation.
Slice
Usage: <Slice Skip="…" Take="…">…</Slice>
The Slice element picks a specific range of values from a value list. You may skip some values at the beginning and specify how many values to include.
Elements:
•Property
•Regex
•Value
•Format
•Concat
•Conditional
•Parse
•Slice
Attributes:
Profile and Schema Export / Import
To move profile and schema settings from one system to another or to back up and restore those settings, the SLIP:td infrastructure provides powerful export and import functionality.
To export one or more profiles, please go to the SLIP Profiles list. Here you can choose to export all the profiles listed and their associated schemas by simply clicking the Export Profiles to File button or you can pick out the relevant profiles by ticking the checkbox for each one and then click the export button.
Please beware that only schemas that are used by the exported profiles are included in the export. Therefore orphan schemas may be lost in a backup-cleanup-restore cycle.

The data for the selected profiles and the associated schemas is written to a single XML file. You are free to edit this file before importing the data again. Using a simple text editor to do search and replace in a profile data file may be the easiest way to change several profiles or schemas in one go.
To perform an import, go to the SLIP Profiles list where you wish to store your new or updated profiles. Click the Items tab and in the New section click Import from File. In the Profile Import dialog window browse to the profile data file and adjust the import options if necessary.
•Uncheck Import associated schemas to skip schema import and only import profiles.
•Uncheck Overwrite existing settings to not update existing profiles and schemas, but rather create new ones even though the existing ones have the same title as the imported ones.
When you perform an import, profiles and schemas are matched by title. This means that when overwriting existing settings, a profile or a schema is considered the same item if it has the same title. Also imported profiles are associated by schema using the title value.
If you have several profiles or schemas with the same title, this may lead to surprising results when importing, so in general it is advised to keep profile and schema titles unique. There is no reason why a profile and a schema cannot have the same title, though.
Display SLIP Pages
<Slip>
<Displays>
<Display Title="Standard">
<Property Name="*" Value="" />
<ShowFrontMatter>false</ShowFrontMatter>
<ShowEmptySections>false</ShowEmptySections>
<UseRedirect>true</UseRedirect>
<Structure>
<Level>
<Matcher>p.Heading1</Matcher>
<Matcher>p.Overskrift1</Matcher>
</Level>
<Level>
<Matcher>p.Heading2</Matcher>
<Matcher>p.Overskrift2</Matcher>
</Level>
<Level>
<Matcher>p.Heading3</Matcher>
</Level>
</Structure>
</Display>
</Displays>
</Slip>
Appendix – How-to
SLIP Create Tasks feature
In some cases a need for republish all or a selection of documents are available. For this purpose a special SLIPCreate Tasks site collection feature has been implemented into the standard SLIP SharePoint connector solution. The button is very helpful but must be used with extreme care and only by trainined people and using a special domain user with correct access permissions described later in this document.
How to use the Create tasks for items action button
When the need to republish occurs the SLIP Create Tasks site collection featrure must be activated on site collection level.

When activate a Create tasks for items button is added to the Actions menu for all Document Libraries found on all sites and sub sites available within the site collection.
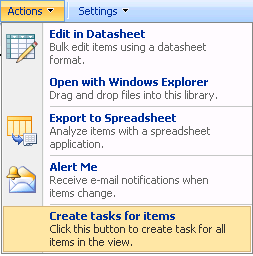
When clicking the “Create tasks for items” button a task for all visible documents in the current view will be created in the SLIP Task List ALSO drafts if the user has permission to see Drafts. Therefore use the button with extreme care and always deactivate the SLIP Create Tasks site collection feature when the process has been completed.
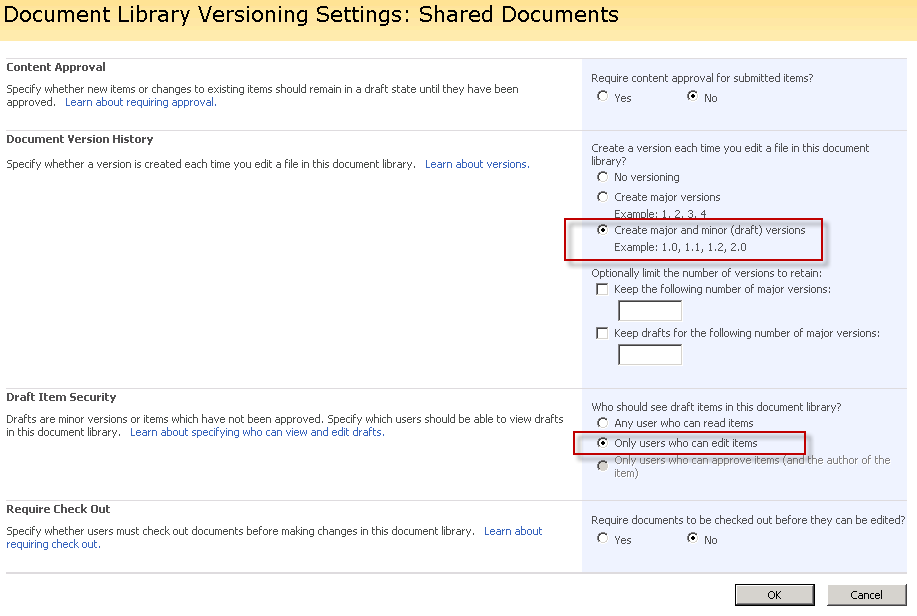
When using the button on document libraries which allow the use of major and minor versions (drafts) you need to be careful not to publish non approved drafts. Below we have described one way to work around it simply by using the correct library settings and a user with only read permissions.
To prevent Drafts/Minor versions being published
1. the Draft Item Security setting is changed to “Only users who can edit items”
2. Create/use an active directory user with only Read Permissions (e.g. named SLIP Task Creator) to the documents in the library.
3. Login with the new user and verify the user can’t see any drafts in the document library
4. Make sure the user has the below specified minimum Permission Level to the SLIP Task List.
NOTE: The built-in “Contribute” role can be used but will allow the user to open and view the task list, which you might not want.
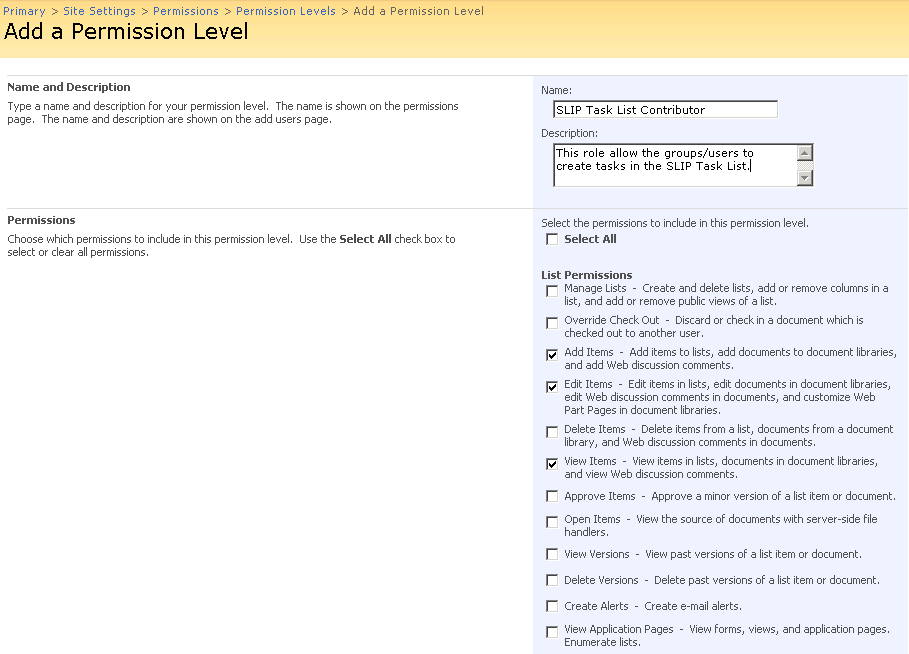
When the read only user and the SLIP Task List access permissions are in place you’re ready to create tasks by following one of the procedures described below:
How to create tasks for items and delete existing SLIP Pages initially
Follow the steps below in the specified order to create slip tasks and delete exiting SLIP Pages in your SharePoint web site. If Hyper.Net are used as the converter technology special steps are required in order for the requests to be created in the Hyper.Net administration/book-keeping system.
1. Disable the Task list processing using the SLIP Task processing configuration procedure
2. Login to the SharePoint as the Read Only user
3. Open your Document Library and select the view/items you’ll create tasks for
4. Click the Create Tasks for items button and wait until it’s completed
5. Repeat step 3-4 for your remaining Document Libraries
6. Clean up data depending on the converter technology used in your installation:
7. If Hyper.Net is used as the converter service perform the following steps:
a. Open the Hyper.Net Administration web site
b. Open the Request View > select All Requests > Display 100 requests
c. Click Select all
d. Click Delete All selected
e. Repeat step c-d until all Hyper.Net requests are removed from the Request View
f. Logon to the Hyper.Net Server
g. Stop and Disable the HN_KTService
h. Enable the SLIP Task list processing using the SLIP Task processing configuration procedure (Hyper.Net will not start to publish yet only prepare the requests)
i. Monitor that all Tasks are changed to Busy and Requests in the Hyper.Net Administration are created
8. Delete all the published pages either manually or refer to the How to use the DeleteAllSlipPages.exe tool procedure for an automated process
9. If Hyper.Net is used as a converter service perform the following steps:
a. Logon to the Hyper.Net server
b. Enabled and start the HN_KTService windows service
10. If not already enabled - Enable the Task list processing using the SLIP Task processing configuration procedure
11. Monitor the tasks being processed in the SLIP Task List and check the published result
How to use the DeleteAllSlipPages.exe tool
If you need to delete all SLIP Pages the simple tool DeleteAllSlipPages.exe can perform this for all SLIP Pages found in any site within a single site collection. The tool has been developed internally by Coextant Systems A/S for Microsoft Office SharePoint Server 2007 using the SharePoint Api and is delivered as-is. The tool must be executed directly on a SharePoint server connected to the farm as a farm administrator.
Follow the steps below to delete all your SLIP Pages:
1. Log in to one of the SharePoint servers as a farm administrator
2. Double click on the DeleteAllSlipPages.exe to open the Windows interface
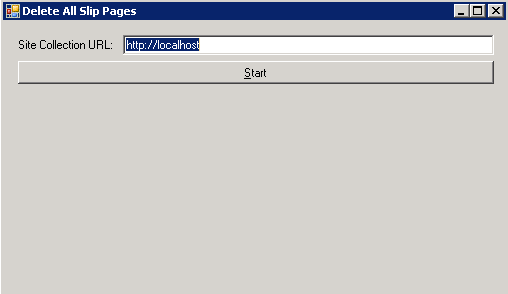
3. Enter the correct address for your site collection
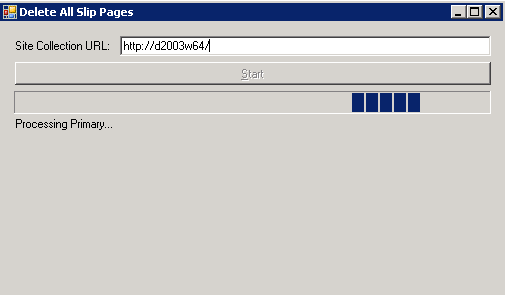
4. Click Start to initiate the discovery process finding/counting all SLIP Pages with the site collection:
Note: No pages are deleted before confirmed later in this procedure
5. Click Yes to delete all the SLIP Pages discovered by the tool
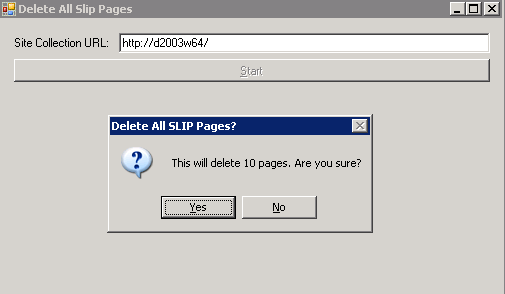
NOTE: This can take 1-2 hours to complete for a large structure with many sites and pages.
6. Click OK when the All SLIP Pates Deleted Successfully dialog are finally displayed

7. Verify that the SLIP Pages are deleted and repeat the steps above for your remaining site collections.
Comments
Article is closed for comments.